


The Pigsty Hill Light Railway -
Building the Wooden Tram or the ‘Orange Box’
I have always been fascinated by the tram locos of the Wisbech and Upwell Railway, although I never got to see them in the flesh, due to their location in the wilds of East Anglia and the scandalous decision not to preserve them.
True enough, you say, but what has this to do with 16mm? They were, after all, standard
gauge engines. Not on my line, they aren't! I needed a drop-
I already had experience of building coach and van bodies and had already build a
similar body from card and strip wood for my Brandbright coffee-
I got as many photos of the original as I could find, and such drawings as were available.
No problem in case of photos, as I had Hawkins and Reeve's excellent publication
from Wild Swan Publications. As to drawings, I should mention here the help I received
from the 16mm Narrow Gauge modellers' e-
I had to decide whether to build a scale model or use the original as an inspiration.
Since I was already doing violence to the original's gauge, I used the size of the
available chassis as a fixed measure and scaled the drawings to fit that. My intention
was to go for the look and feel of the original -
I prepared my drawings. A scanner and basic PC picture manipulation software were a great help, but surprising results can be obtained from a photocopy machine with variable reduction and enlargement. If you're a real Luddite, there's always squared paper and a pencil. The interesting bit is deciding which bits are going to fit inside which. I found a cardboard dummy helpful and marked out accordingly. In this case the false roof (with a hole for the chimney and the Playmobil aerial) fits inside the sides and ends, and the floor outside both. The curved roof would fit on top and flush with the sides and ends at a later stage.
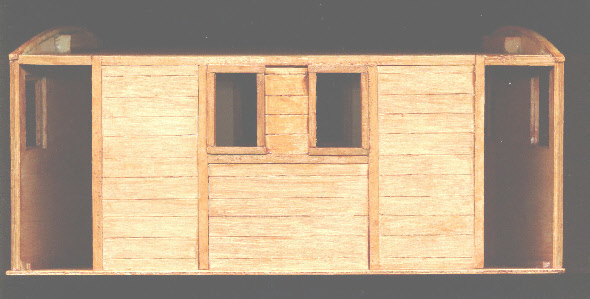
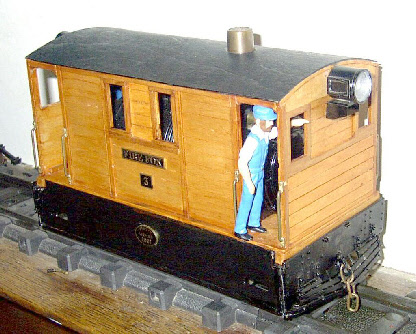
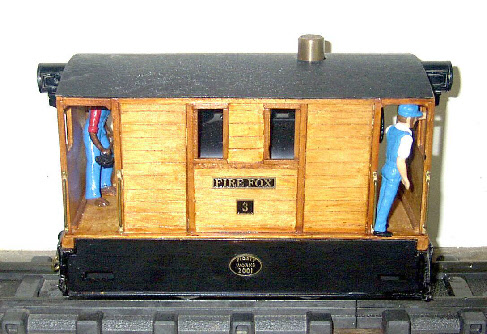
I built the box, or, in this case boxes. The W & U trams were essentially conventional tank engines with a metal box concealing the working gubbins and a wooden box concealing the boiler and fittings and sheltering the crew.
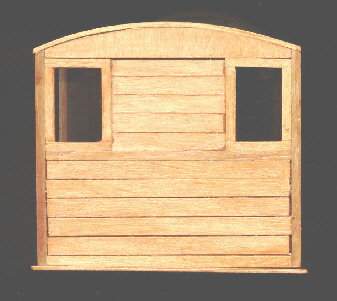
For the wooden box, I used the thinnest grade of ply from the local model shop, with window spaces cut out. Since these were going to be panelled at the edges, I cut them slightly larger than on the drawing to ensure no ragged edges showed. I used a similar technique for the ends, which would be mounted away from the main box to allow space for the doorways.
The box and ends were then panelled with strip wood from the same source, and using thinner strips for the thin vertical and horizontal bits between the planking (the pictures should confuse you even more). For planking, you can either scribe lines in ply with a sharp bodger or lay individual bits of strip wood. If you've got lots of verticals, the latter can actually be easier, as in this case. The trick is simply to look at the original, or one similar if you're freelancing, and lay out the bits as in the real thing. Despite all the fuss about ramin and obechi, it doesn't matter what wood you use, if you're going to paint it or varnish it, because the plywood box provides the strength, and the covering protects the surface. I have been known to use balsa instead of hardwood in extremis, and it hasn't fallen off yet.
The box was then assembled, using PVA wood glue and strengthened by 1/4" hardwood inside the corners. This is the most crucial part of the process. The box MUST be square in all three dimensions. Fortunately, with this glue you have time for some fiddling before it sets. Assemble it on a flat surface (a sheet of glass is ideal) and use a genuine square to check it. It doesn't have to be a set square, but it had better be true or you're in deep fertiliser. You will notice that the end isn't quite square and that caused me no end of trouble. The whole was then painted using mahogany outdoor polyurethane varnish.
1/4" strip wood beams were glued to the bottom of the box to receive the underframe and painted as above (yes, I know it should have been done before).
The metal box which conceals the wheels and motion was made out of two Garden Railway Supplies white metal cow catchers and two side sheets were cut from fairly thick brass sheet from the K&S range (model shop again), and with footholds cut out. The smallest size of square brass tube was superglued to the bottom of the side sheets, which were then painted black, as were the cowcatchers. I used a proprietary brass primer, which I won't recommend as I'm told it gives a lumpy finish.
The cowcatchers and side sheets were glued to the beams from 8) The side sheets were connected to the cowcatchers by pins through holes drilled in the latter and glued into the tube.
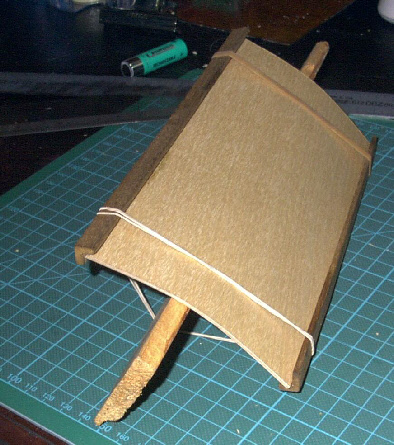
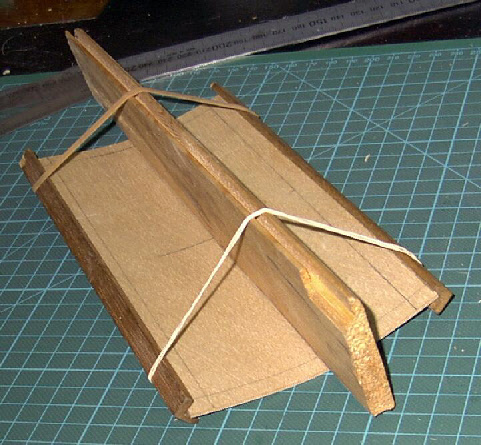
The roof was cut from more thin ply and shaped by being held by a rubber bands and
L-
I discovered that the discarded plastic boiler and backhead from a Playmobil "steam"
loco would look excellent inside the box, so off came the roof, in went the body,
and back went the roof. A dead pressure valve was fitted for appearance's sake and
the steering wheel and linkage from a jeep kit added as a duplicate regulator at
the non-
Ozark Models headlights (from Chalk Garden Rail) were fitted at both ends on brackets
made from shim brass, and the "leading" end fixed up to work off the Playmobil or
IP battery. Brandbright brass handrails were added at the doorways. The chimney,
a length of plumber's copper tube, was turned (sort of) in a drill and will be replaced
by something more aesthetic when the Round Tuit arrives. The Playmobil aerial fits
through a hole in the base and up the chimney. Tenmille three link couplings were
chopped down to just the hook and superglued on to the cowcatchers. This was not
a success, as they fall off at regular intervals; at some point I will attach them
properly. Name, number and builder's plates were ordered from MDC via Brandbright
-
An IP De Luxe chassis was slightly modified (the spacers were brought in about 1/4"
at each end) and it fits nicely. An on-
Garden Railway Supplies produced a ready-
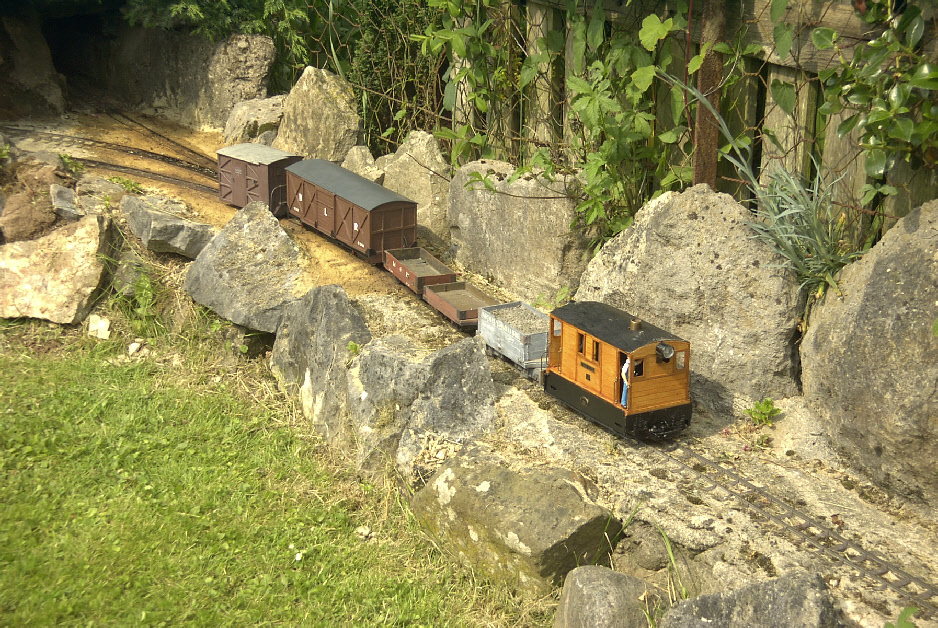
Why the Orange Box? A certain Mr Binnie called it that after its colour, and the name stuck! The picture below shows the beast running on Colin's line in Wells.
Officially, it was given the re-
NOTE: This page is based on an article I wrote for Sixteen Millimetre Today magazine. See SMT Index to find my articles