The Story
This is the story of my first attempt at building (or bodging together) a steam locomotive.
The Coffee-
Many people have helped with this project, too many to name individually. However, first and foremost, thanks go to Liz for buying me a Meccano set for Christmas and being patient for over a year while I got around to using it.


The Power Unit
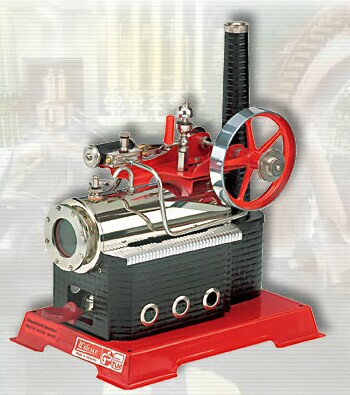
The Wilesco D14 stationary engine (with double-
I bought the beast and before ripping it apart, I ran it a few times on the "rat-
Now the real work began!
Gas Firing
The next step was a crucial one -
The gas tank is connected to the burner by braided silicone tubing and held on by
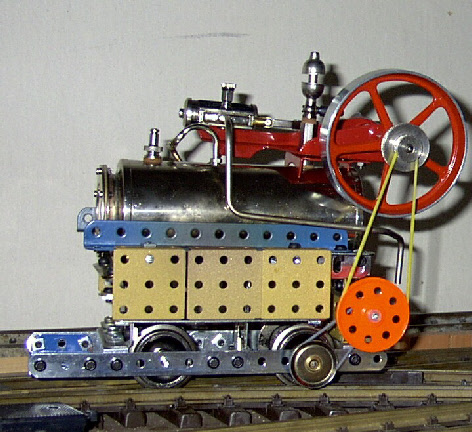
cable ties. This seems to have worked well. Note that the wheels were now connected
by a Meccano sprocket and chain drive -
The Test Bed
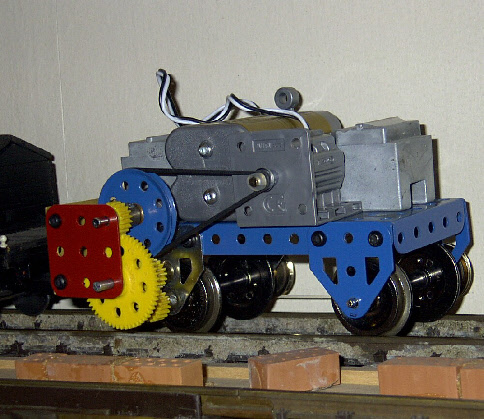
Just for once, I'd prepared myself before spending money on the materials. I set
about building a test bed for a geared chassis, using Meccano components, including
a very rapid electric motor. This was fitted with belt drives and a plastic gear
train, to produce a beast that ran at a sensible speed. For a narrow gauge line I
believe that’s about 10-
Many of the features of the finished beast were already there -
The Pigsty Hill Light Railway -
The Thing or ‘HEDGEHOG’ -
The Prototype Running Gear
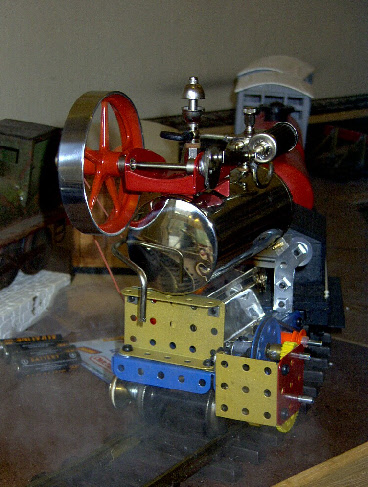
The next step was to mount the steam power unit on the test bed and link it up with band drive.
Very crude, and the boiler was much too high but, nonetheless, it worked!
The Beast Evolves
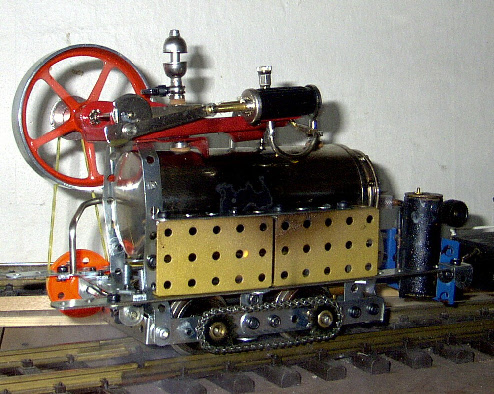
Now to build a made-
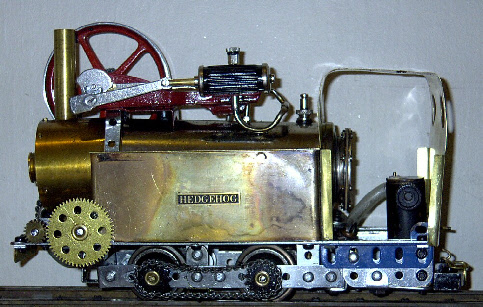
The Final Product (1)
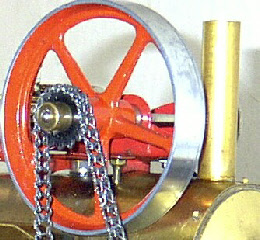
Finally the Meccano sprockets, chains and gears, ordered from John Thorpe Meccano,
arrived. The front end was completely rebuilt, and the sharp-
The right-
Shielding
This beast still used the "rat-

Metal-
Now to start making the beast look like a real locomotive:
The smokebox is made of thin brass sheet wrapped round the boiler and bolted to the
footplate, and the side tanks are made of thicker brass bent and soldered into shape.
Note the smokebox door -
More metal-
I searched for the right shape and, in a hardware shop, I found a rose for a doorknob and decided that would do.
The small (10BA) bolts in the smokebox, with the nuts outside and the shafts cut flush with a slitting disc, hold two thin brass strips bent into circles. These form a seat for the door, which is sealed with silicone adhesive. The whole is finished off with the badge of the 16mm Modellers Association. Steam from the boiler (the bent stainless steel pipe on the left) is diverted by silicone tubing and a brass tube up into the smokebox and thence out of the chimney (brass tube which was in my bits box). The thin steel strip Meccano strip above the side tank was a failed attempt to stop the power unit being pulled over to the right. A much more elegant solution was found later.

A Cab
Here we see the wrap-
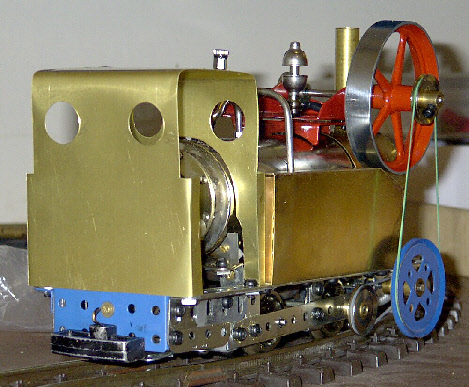
Detail
You'll notice that the power unit no longer leans to the right -
The Final Product (2)
The Left-
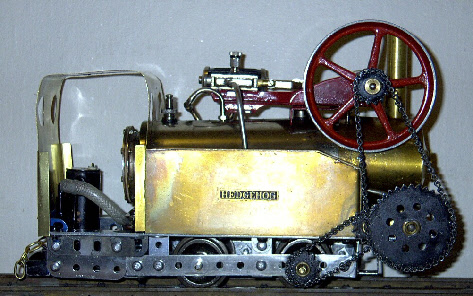
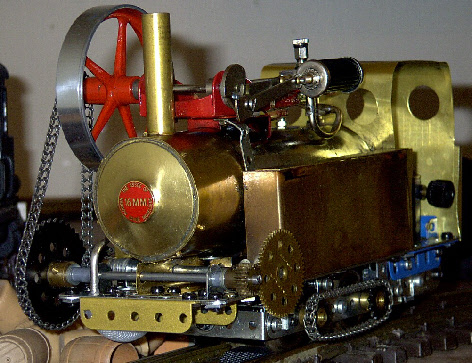
Standard ‘glamour’ shot
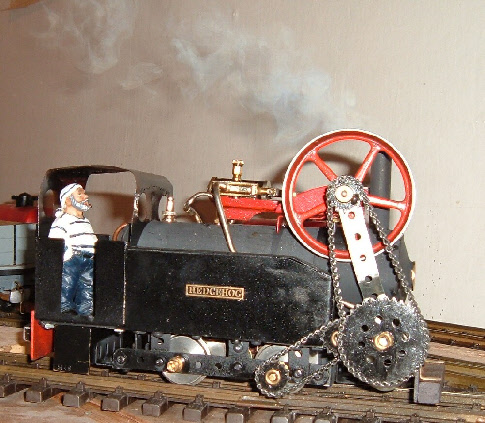
Painting
After much soul-
The boiler and chimney are heat-
Adjustments
And here it is with a smaller flywheel, curiously from a Regner Konrad (thanks to Rob Bennett).
There’s also a new gas tank, a second from Cheddar Models

Conclusion
This will probably be the final configuration -
The beast is now named "Hedgehog" and is a valuable part of the PHLR's motive power stud.
What I Learnt from Building the Thing
1. The Yahoo! 16mmNGM e-
2. Don't be satisfied with the first design. Try moving things around, both on the loco and in your head. Meccano makes this a whole lot easier but, by its modular nature, limits your design options. This may, or may not, be a good thing.
3. When you think you've got a good design, don't judge it on its first run.
a) Run it in well, keeping it lubricated. This applies just as much to bought-
b) It helps to have a tight, sloping indoor track -
4. Lubrication is vital -
5. Just about any steam engine will provide enough power to drive a useful loco -
a) Five (scale) miles and hour is a perfectly reasonable speed for an industrial loco, and ten for mixed traffic, on the kind of lines most of us model. Of course, it's different if you're modelling a Festorail IC 125, but how many of us do that? For that matter, would you rather have a sip of your nice cold (or hot) drink and wait a couple of minutes for the next train to come by, or watch it whiz round like a demented hamster.
b) Bear in mind that the effects of friction are worst at the high-
c) The Wilesco single-
6. Getting a burner right is a black art, whether gas or meths (alcohol in the USA),
just as it is with a real coal-
a) The thread of the jet is sealed. I've used silicone adhesive, which seems to do the business. DON'T GET IT IN THE JET! If the jet gets blocked, blow out the gunge with a blast of butane from the can.
b) Sufficient air is dragged into the burner -
c) The burner is level -
d) The flame is even -
e) The burner is the right distance below the boiler. "What's that?", I hear you ask; consult the authoritative volume "Trial and Error", by A. Bodgeller.
f) The gas tank doesn't get too cold so it won't supply enough gas -
g) The burner's heat is confined around the boiler. Side tanks help here, and the Mamod is well nigh perfect in this respect.
h) Yes, it IS complicated -
7. Reinforced silicone tubing is excellent stuff for connecting gas tank to burner (fix it firmly with cable ties) and leading exhaust steam up the chimbley. PPS Steam Models do the stuff at a very reasonable price.
8. Look for bits and pieces that will fit your needs:
a) The smokebox door is the rose from a doorknob fitted with a 16mm Association badge. It's sealed with silicone adhesive, a very useful material that I've also used to fix the cab to the side tanks.
b) The wheels are Bachmann large wagon wheels forced off the original axles and on to 1/8" steel rod. These are brought up to Meccano's 5/32" by slipping brass tube of that diameter over the outer end of the axles and superglueing it on. A separate set of 32mm axles has been made from Meccano rod.
Nothing exceeds the pleasure of watching a loco you built and designed yourself trundling
along your railway. Even the multi-
Five Videos of the Thing in Action
The Thing au naturel 1 The Thing au naturel 2
WARNING -