
Cut it Out
I found it easiest to take a block of track (either all curves or all straight) of a maximum of three yards/metres from the garden to the workshop, and firmly fix it together with rail clamps. Then, I took the gauge that I had prepared earlier, and drilled pilot holes in alternate sleepers, taking care with the curved tracks that I was drilling on the correct side (although the 32mm track is always on the inside of the circuit there is one reverse curve). Then I went round again with a larger drill bit, boring holes to just clear the stalks of the rail chairs. It helps awful lot at this point if you have two drills, otherwise you'll go mad swapping bits between jobs!
Now it was time to cut the rail; SWMBO (see above) bought me a jigsaw for Christmas
some years ago -
When this is done, it helps to clean the rail end either with a file or slitting
disc -
Getting it Together
Next, I inserted the chairs, and turned the track upside down and melted the rail
chair stalks flush with the bottom of the sleeper. I used a 25-
Finally, the rail is slid into place in the chairs. If the amount needed is more
than a single three-
You will find that the Code 250 joiners are too long to fit between two LGB sleepers and will have to be cut in half. A slitting disc in a Dremel or similar tool is ideal for this job. Fit this half joiner on the rail that is already present and slide the new rail to fit into the joiner.
Once the block of track had been converted to mixed gauge it was tested in the workroom
with my radio-
The Great Escapes
Now the SVRR escapes had to be fitted. This involved cutting an existing straight
track to make room for each escape; once again this was done in the workroom rather
than out in the wild. This was arranged so that the line diverged after a straight
section of mixed-
These SVRR escapes were made of Code 250 rail and had to be joined to Code 250 and LGB rails. The former was trivial, the latter easy (if expensive), as Hillman in the USA do rail clamps for just this purpose and these are available from the excellent Glendale Junction by mail order.
Fitting the Code 250 rail to the LGB on the toe and 45mm leg was relatively simple (if a little fiddly) with these clamps. What may not be obvious is that they come in mirror image pairs, with the grub screw on the outside. What may be even less obvious is that you need a spare Allen key if you'll be doing this outside. At your local ironmongers/hardware store, they'll happily match the one that came with the clamps, and it's a good deal easier than crawling around a damp garden on your knees with a fading torch.
The 32mm gauge leg of each escape connects to a length of track made from Code 250 rail, assembled on thin hardwood sleepers, using Code 250 chairs. The holes for these are drilled 34.8mm apart (32mm + thickness of rail head). From the photos, the observant will note that I initially drilled the sleepers at 32mm centres. D'oh!!
Getting the Point or it'll all Turn Out for the Best
Initially, the Pigsty Hill sidings and the mythical brewery lines used Tenmille points and PECO set track, but I soon converted these to Mamod track, and am pleased with the result. However, this had to be fixed to Code 250 rail.
I had an advantage here; the very first PHLR used the a similar combination. The secret is to mount both on a small piece of hardwood, in this case ramin from the steaming jungles of British North Borneo (the setting of that first railway).
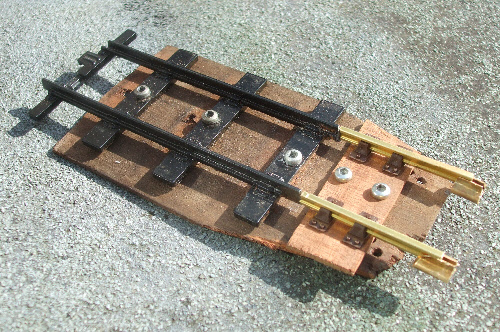
The next step is to cut a Mamod straight track in half and file the rail ends flat. Four holes are then drilled in the wooden base to take the stalks of rail chairs and two holes to match those in the Mamod track. The chairs can then be inserted in their holes, with a washer to get the height right. The stalks are melted on the underside to hold them in, as with the LGB sleepers, and the Mamod track bolted down to the base.
I slid short lengths of rail into the chairs, offered the assembly up to the existing track, marked the lengths where they needed to be cut, and did so with a slitting disc. Once again, the gaps involved were too short for full size joiners and half joiners were used. The assembly was joined to the existing track.
When I took this assembly out into the garden, I found it easier to add a few Mamod tracks before connecting them to the rest of the line. Otherwise, it is very easy to undo all one's good work while trying to complete a Mamod loop; anyone who has ever laid Mamod track will know what I mean! The mixed gauge and 45mm ends were connected up and clamped in and that, said John, was that.


The Pigsty Hill Light Railway -
Mixing the Gauges
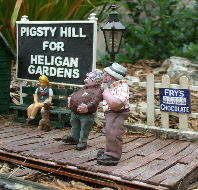
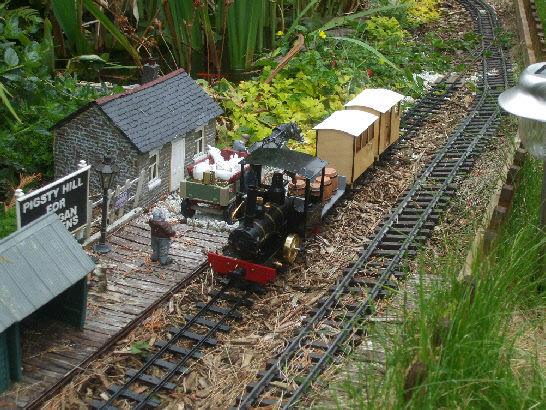
Brewery train on 32mm track at Pigsty Hill meets with the Sage’s approval
The Situation
I now had a 45mm circuit with passing loop and a simple station, the garden was growing
up nicely and all was perfect. Well, almost -
It all started in a very small way with the Pigsty Brewery Railway at the back end of 2008.
The Pigsty Brewery Railway
I had acquired some IP Ezee stock ; in fact I built it for a review in Garden Rail magazine. Some of it was constructed to 32mm gauge, I needed somewhere to run it, and the result was the PBR. Connecting this to the PHLR involved a section of mixed gauge track, and I threatened then to describe how I built it. Purists should look away now.
An Economical Solution
The decision had been made at the highest level to convert a length of the Pigsty Hill Light Railway to mixed gauge, and there was no appeal against this fiat. In my rôle as Chief Civil Engineer of the PHLR, however, I judged the project to be fiendishly expensive, as well as involving the scrapping of a fair length of costly LGB track.
When I put my mind to the problem, it occurred to me that it might just be possible
to add a third rail to LGB track. With the kind help of a couple of members of the
16mm e-
Aid from Afar
The main problem was to arrange for the 32mm track to join and leave the mixed gauge track.
If I may, I would like to state a general principle here; if you are going to use two gauges, arrange for the mixed gauge section to be plain track, and arrange any sidings and loops to be after the tracks separate. Mixed gauge points are expensive in construction and maintenance, and are avoided wherever possible on the prototype (but note that I eventually had to get just one of these to allow 32mm trains on both platforms at Pigsty Hill).
My saviour here was Sunset Valley Railroad in the States. I'd already looked at their
web site for mixed gauge track and turnouts, the price of which induced a sharp intake
of breath. I e-
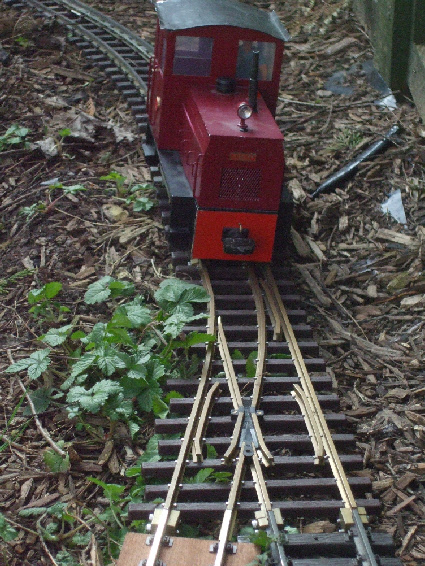
The escape in place
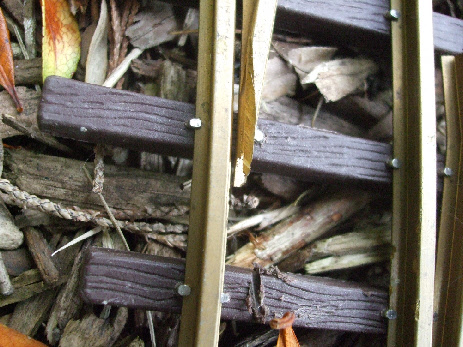
Detail of escape, showing rail cut away for flanges and, alas, gouge in sleeper
Railchair Modelling
A local model railway shop was happy to order the necessary Code 250 rail from PECO so that I could take it home by hand, rather than pay extortionate postal charges. The Code 250 chairs came from Brandbright.
When these arrived, I immediately saw a problem; the stalks that fit into the sleepers
were plain, rather than formed as a clip. This meant that they would pop out of the
sleepers at the slightest provocation. The answer, as so often is the case, appeared
on an unrelated thread on the 16mm e-
Bend it, Shape it
Bearing in mind my experiences with the first PHLR, I decided to bend the rail with a rail bender rather than by hand. I was considering buying one from Garden Railway Supplies when one of my local 16mm colleagues was good enough to offer to lend me his. This was set up with rollers for Code 215 rail, but it didn't break the bank to order a set of Code 250 rollers from the aforesaid GRS. Once I'd realised that the job went better with the bender mounted horizontally so that the track didn't flex due to gravity, it was nowhere near as difficult as I expected.
It's just a question of screwing the wheel in to the correct amount, and pulling the track back and forth until it looks right against a length of R3 track. What's the correct amount? You'll find it by trial and error and then you can mark it on the bender (in pencil please, if it's borrowed).
Please, please don’t embark on a project like this without one. The result will be
as described in The Early Days -
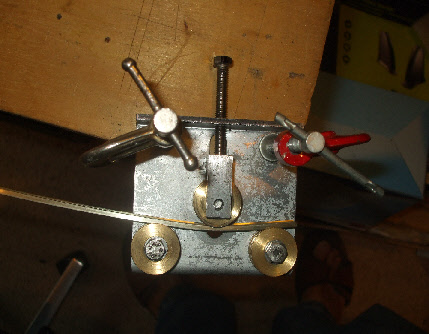
Bending the rail
Fettling
Well, not quite. The SM32 curves needed to be bolstered a bit with the wood chippings that are used as a mulch in my garden, to bring them up to the same level as the SVRR escapes (the track was eventually ballasted with a mix based on Perlite). Once this had been done, testing could begin. I used my IP Ezee Range Daisy railcar and my Hunslet. The former was fine; it ran through the 32mm path of the SVRR escapes and mixed gauge in both directions with no problems.
The Hunslet, however, was another kettle of fish entirely (well, not exactly, it's
a battery-
It's the first time I've used the Macro facility on my fairly basic digital camera,
and I'm impressed by the result. Unfortunately, it also shows the gouge in a sleeper
where my mini-
Running
I'm pleased to say that I've had almost no problems with the mixed gauge section or the SVRR escapes and, as long as I keep flora and fauna off the line, the Pigsty Brewery Railway runs to schedule without interfering too much with the "main line". Much to my pleasure, visiting locos have negotiated the 32mm section without major disasters.
The Future
As I’ve hinted, I’m planning to replace the escape by the Pond Curve with a single point, so that the platform nearest the path will be dual gauge. This will allow 32mm trains to pass in the station. More waffle about this is threatened...
See Real History for the mixture of fact and fiction that inspired changes.
For images from this period see:
The PHLR Mark VI -
NOTE: This page is based on articles I wrote for Garden Rail magazine. See Garden Rail Index to find my articles
Joining the rail to Mamod track

The layout as of December 2009